Thursday, March 19, 2015

Am I blue...


At a meeting of my local Costumer's Guild chapter, one of the members brought in a book that had some beautiful photos of Italian Renaissance portraits. So the two of us decided to make some Italian Ren costumes for the upcoming Figments & Filaments costume convention.
Looking around the net, I fell in love with La Bella Nani by Paolo Veronese. That gorgeous blue! Those cutwork sleeves! I had to make it.

And it fit right into the schedule for the Historical Sew Monthly group. January's theme was foundations - perfect time to make the camicia (chemise). February's theme was blue - perfect for the dress!

I used Margo Anderson's Elizabethan Lady's Wardrobe pattern as my base. I adapted it to fit a more Venetian look. But the most elaborate change was the sleeves. I combined the "paned" version of the sleeve into one solid pattern. Then came the hard part!


First I had to measure the image and figure out the conversion to make it full sized. (Who says that I never use my math degree in real life?)


I drew a grid on paper and started sketching out the major sections in full size.


Then I traced them onto the pattern piece in the right layout.


Using an X-acto knife, I cut out the openings on 1/2 of the pattern.


 This is how the pattern "stencil" ended up.
 
I cut the sleeves out of the velvet material and fused interfacing on to the back of each one. The interfacing had 2 purposes - to give the sleeve a little more body and to keep the cutwork edges from raveling.

Using my  "stencil", I traced the design onto the interfacing, flipping it over to do each side.

Then came HOURS of cutting the holes with applique scissors!


Here's what I ended up with:
The blue is not really this, um, vibrant. It's a nice royal blue.


Thursday, March 12, 2015

Here we go steampunking again!

Hubby & I went to Teslacon again in 2014. It's the biggest steampunk convention in the Midwest. And this year we kidnapped convinced one of Tom's friends to come along. Mwah ha ha! Another person brainwashed into the steampunk aesthetic!

Hubby wore the same costumes as last year, but I had to create new ones of course.
(All photos from Realtime Portrait Studios)

Here they are:

This is my stab at ethnic steampunk. The funny thing is that I had everything already except for the brown corset and that was pretty easy to throw together.

This is my pseudo-Japanese demon. I also had everything for this already. I made the horns several years ago out of upholstery foam. The top and obi/sash were from my wa-lolita outfit. Pants are from my Bedouin costume. Why is this steampunk? Beats me. Maybe some Victorian/steampunk travelers encountered the demon in their travels through Asia. But it was fun!
(Those of you who know Japanese costume may notice that the top is folded the wrong direction as if I were dead. I thought that this would be appropriately sinister for a demon.)

This one was the best in my opinion - a broken clockwork doll. The brown corset is the same one from the first pic above. You can't see it, but the fabric pattern of the skirt and the shoulder decoration is little steampunk octopi with gears and top hats! Here's a link to the fabric pattern on Spoonflower. Isn't that adorable?

Here's a close-up of my makeup:

The necklace and earrings are cute little pink octopi. They basically inspired the whole outfit.

Monday, March 9, 2015

Le Jazz Hot

Some people from our local chapter of the International Costumers Guild decided to go to a jazz club a few months back. So we got all fancied up in our best flapper dresses! I'd been holding on to a gorgeous chiffon sari that I bought on ebay several years back. I initially bought it thinking about a regency dress, but the opportunity hasn't come up for that. So a 1920s beaded flapper dress it became. :-)


Me & hubby as the gangster and moll.

I used the 1924 2-hour dress pattern layout that's floating all over the internet. I made the under-dress in plain beige satin that I had in my stash. Then I put it on my dress form and draped the outer dress right on top of it in order to take advantage of the beadwork patterns on the sari. The only change I made was to make the rectangles for the skirt wider for the outer dress. This made the chiffon drape a little at the sides to give it a nice fluttery effect. I then cut out some beadwork sections from the remaining part of the sari and used them to trim the back neckline of the dress. I also used some of the remaining sari to make the matching head band.

It's too bad the photos don't show the full, glittery effect of the silver bullion embroidery!

Me, Jennifer & Bethany in our flapper glory.
Full length shot.

Saturday, March 7, 2015

Figments and Filaments 2014

I know...I have been very lax about posting my costumes. Mea culpa.
Since my sister asked where my pics were, I decided to catch up a little.
So here are pics from a brand new costume convention that started up in the Midwest - Figments and Filaments. 2014 was the premiere year. I went because I absolutely adored some of the guests of honor. (Especially the lady who does the Gothic Charm School website!)

Anyway, on to the costumes...

I didn't make anything new for this one, but I got to wear a good variety.
I entered the fashion show with the game character costume that I made for Naka-Kon.(Photo taken by Chelci Gearhiser)


Got a really great photo of my 18th century dress. (Photo by ImageCollectors)

Here's me and Jennifer talking to people about our local chapter of the International Costumers' Guild.

Saturday, March 22, 2014

Naka-Kon 2014

Once again it was time for Naka-Kon! I had a little extra notice for it this year, so I think my costumes were a little better. I was one of the workmanship judges for the big cosplay contest, so I got to see all the best costumes up-close and personal. But that was only on Saturday, so I had Friday night and all day Sunday to play around. :)

Friday night costume:
Friday's costume had to be something quick to change into because I planned on going straight from work. So I threw together this black & white lolita outfit. I already had the all the pieces. The only thing I did was to use some of my left-over white ribbon roses from the skirt to swag the bottom of the dress. I also used them around the top of the dress, but it's hard to see in this photo. You can also see my cute little dog purse peeking out around my right side!

Saturday's costume:
I went a little more elaborate with this one because I was judging costume workmanship that day. I wanted to put a little more effort into it to show that I knew what I was talking about.

The entire outfit was based on the shoes. They're from American Duchess and they're called the "Antoinette". Lovely little repros of 18th century mules. They come in pink, too. My costume ended up so froofy! (Yes, I know that's not a real word.) Every time I looked in the mirror, I couldn't help thinking that it looked like a wedding cake exploded all over me.  ;)

And the one that took the longest to make....

Sunday's costume:
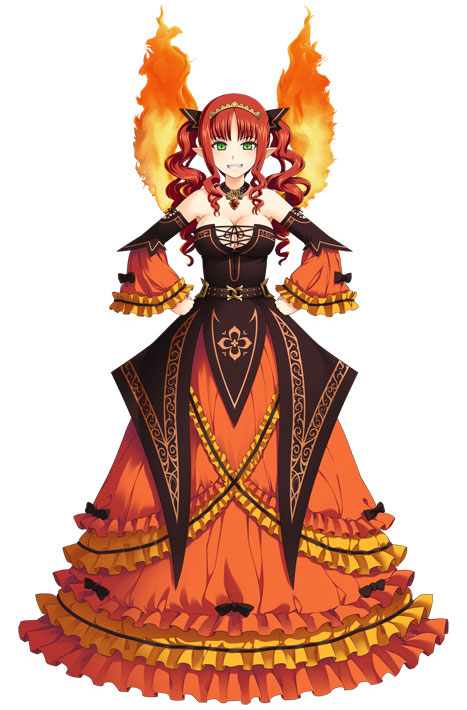
It's a reproduction of a character from a Japanese video game. It's not one that I've ever played. (WAY too racy!!) But I looked through the website Anime Characters Database for costume ideas and I loved this one. Here's the original pic:
I think it turned out pretty well!

My sister gave me the hoop petticoat from her wedding dress over a decade ago & I finally used it. Thanks Jo! And the brown ultra-suede fabric has been in my stash almost 15 years. I only had 2 yards of it, and it ended up being just barely enough.

On Sunday, the photographer brought her little girl to the convention and she wanted a picture with me. (She was quite taken with my dress!) I crouched down to be at her height, but then she crouched down, too. She was SOOOO adorable!
(All photos taken by Kansas City Photography)

Thursday, December 5, 2013

Woohoo! My article goes public!

The reason I started this blog was to document the creation of my competition costume for Costume-Con 2013.
Then I decided to wait until after the competition for my tell all story.
Then I was asked to write an article on its creation for Virtual Costumer e-zine, so I put it on hold here once again.

Now you can read the whole thing!
The older versions of Virtual Costumer are available to the public when a new version comes out for the guild members. So my article is now available for your viewing pleasure.

http://www.siwcostumers.org/newsletterarchive/VirtCostV11-I3-2013.pdf

Sunday, November 10, 2013

Book reviews

Yay!! I got some new costume books in the mail!

I'm a librarian by trade, so pretty, new books make me happy.

Anyway...on one of my historical costuming lists someone asked if the Martha Pullen favorite places series of books were any good. They are at Hamilton Books for $7.95 each so I decided to take a chance on them.

Bottom line...I would have paid much more for them. They are a steal at that price!
The ones I got were these:


 I didn't get the DAR quilt collection book or the V&A children's collection books because those areas don't really interest me. Oh...and the Martha Pullen's vintage collection book is volume 1. Hamilton Books didn't have volume 2 available.

For those of you who don't know who Martha Pullen is, she is the founder and editor of "Sew Beautiful" magazine. She also has a big business in heirloom sewing and quilting supplies, sewing books, and TV sewing shows

For historical costumers, here's the run down on the books to give you an idea of whether or not you'll like them.

First of all, they are much heavier on children's clothing than most costuming books. There are between 50 and 60 items featured in each book and they are split about evenly between adult and children's/babies' clothing.

Second, since Ms. Pullen founded her business on heirloom sewing, there are a LOT of things with lace and/or embroidery.

Third, there are almost no men's clothing at all.

Fourth, most items are featured in a 2-page layout. One large, full-page photo of the item with a 1/2 to 3/4 page description that includes 1 or 2 small detail shots. There are 5 or 6 items in each book that are given a 4-page spread with more photos and detail.

Fifth, there are small drawings of some of the embroidery patterns from the items in the back of each book. The drawings can be enlarged for use in hand embroidery and re-creations of the items. There is also a mention that Ms. Pullen sells a CD with the embroidery patterns for machine embroidery.

Finally, the items featured are mostly between the late 1890s and early 1910s. I'd say at least 3/4 of the adult clothing falls in this time period. (except for the DAR museum book)


Comments and criticisms on particular books:


The Kent State Museum

I've always wanted to visit the Kent State Museum's costume collection, so I was very excited to see these books.

They have a couple of dresses from the 1820s, but most things fall into the time period that I mentioned above.

Descriptions of the items are good, sometimes giving dimensions of lace or trims, etc. They also mention things that sewers like to know, such as bodices and sleeves cut on the biases and things like that.

My only criticism is that the dates are sometimes hard to find for each item. Each description starts with a quote from a period magazine or book that relates to the featured item. The date for the quote is clearly given. But sometimes these quotes are several years off from the actual date of the items. You must read through the first paragraph of the description to get the clothing's date.

But that's a small quibble and shouldn't deter you from getting the books.


The DAR Museum

This entry in the "favorite places series" is a little more spread out time-wise and gender-wise.
There are several men's waistcoats from the 1700s and up to the 1830s.

The women's clothing is also earlier than those from the Kent State books. One item from the 1700s, 5 from 1800-1820s, 5 from 1830-1860s, 4 from 1870-1880s, and the rest from later.

The date for each featured item is found right at the top of the description. The items are separated by age and gender. All of the children's clothing is at the front, then women's clothing and then men's clothing at the back.

The descriptions in this book are a little more geared toward what was going on in society and fashion over-all than the previous books, but still have some of that construction info that we costumers love.


The Vintage Collection of Martha Pullen vol 1

Ms. Pullen collects white clothing with interesting lace and embroidery. So that's what you'll find in this book. The vast majority are white. And out of the women's clothing, only 1 item is earlier than 1900.
This book, like the others, is split evenly between adult and children's clothing.

It also has 2 pillows and 2 embroidery scraps featured in addition to the clothing.

Unlike the others, which were written by curators of the museums mentioned, this book was actually written by Ms. Pullen. Since her main interest is in sewing, the descriptions in this book are more geared toward sewers. She gives much more nitty-gritty detail about the construction than the other books in the series.

For example, here's a paragraph from the description of a woman's camisole from c.1900:
"The padded satin stitch flowers and bow design on this particular piece were worked on both fronts of the camisole and again at the center back. Hand scallops formed with a buttonhole stitch were meticulously worked all the way around the neckline, down both sides of the front, and around the armscyes. A strip of a beautiful Swiss beading, through which ribbon is run to cinch in the camisole, defines the waistline. Eyelets worked in sets of two completely around the neckline serve the same purpose; ribbon is woven through them to pull up the fullness and to tie the camisole closed at the top. The bottom was finished with a 1/4 inch wide hem secured with a running stitch. The seams are French, and the whole camisole was made entirely by hand."
The pictures aren't as interesting for me, because of the white, white and yet more white! of the items, and because of the narrow time period featured. But the construction details mentioned more than make up for that. I might have bought the second volume at full price just for that, except that it's out of print and used copies I've found are way too expensive.

All-in-all, I'm glad I bought these books. The photography quality is good, the usefulness of the descriptions varies, but is overall good as well. Definitely worth more than the $7.95 I paid for each of them.